
Keep your kids engaged and let them learn from the world of science and arts giving them the base to the perfectly balanced education for the future! https://wizkidsclub.com/ introduces some fascinating STEM/STEAM based electronic projects for kids that will fulfil their curiosity, increase technical knowledge and enhance their familiarity with electronic items.
You’ll see how the STEM/STEAM way of educating them makes them caring and sensitive as well as scientifically erudite. Once they’ve made a choice and drawn out the necessary images with the proper coloring, it’s time to get to the scientific part in place with the LEDs and the circuit.
Check these out with your kids!!!
LED Bookmark
Get your kids to build a low-voltage electronic circuit bookmark that they can create with cardboard or even simple hard paper. All you will need are conductive copper tape, a couple of colorful LED bulbs and the power-source of a coin-cell battery. These apart, stickers or colors to draw and decorate the bookmark.

There’re a lot of creative and imaginative ways to create a LED Bookmark and kids can choose one according to their preferences. But what remains the same is the basic circuit building that is both simple and also explains to them the theoretical working of any electric circuit.
To begin, cut out a rectangle of 8 inches x 3 inches from a thick craft paper and fold it into half along the longer side. Next draw a circle on the inside of the bookmark that will hold the coin-cell at the bottom. This will act as the switch of the bookmark and will illuminate the LEDs when pressed.
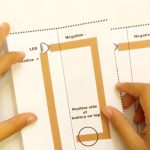
Now cut out 2 small incisions on top of the front side of the bookmark that will hold the LEDs. Following this take the LEDs and color their positive legs to help you identify them better. Use a wire cutter to make the legs smaller for easy fit and better working in the bookmark.
Download template:

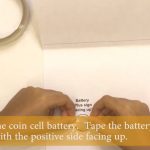
Insert the LEDS and separate out their legs on the inner side keeping the negative side on the upper side of the bookmark and the positive legs close together towards the lower side. Now, it’s time to attach the negative legs of the LEDs to the negative side of the battery with a copper conductive tape. Attach the copper tape to the negative legs and run it across to where the tab cut out begins stretching it to the point where the batter negative lies. Secure the battery to the inner surface of the bookmark with tape.
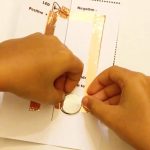
The next step involves connecting the positive legs of the LEDs but, without attaching it to the battery. Place the copper tape on the positive legs and extend the tape to the point where the positive side of the battery lies on the opposite side. You will also have to make sure that the pathways of the positive and the negative sides do not touch each other.
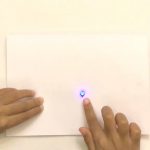
The coin battery acts as the switch lighting up the LEDs.
Now its time to decorate your bookmark with artwork of your choice and use it!

LED Birthday Card
In our second module of learning electronic projects for kids. We will start by Cutting out a rectangle of 6 inches x 4 inches from a craft paper and draw a birthday cake with a candle with a burning flame on top. Color the cake brightly with your preferred colors leaving out the flame part because that is what is going to burn brightly each time you press the card!

Once done, flip to the inner side of the card, exactly on the backside of the cake drawing. Cut out a small hole on the flame of the candle to insert the LED. Mark out the negative leg of the LED by coloring for instant identification later. Now draw out a rough circuit extending a negative arm from the incision across to the other flap of the card bringing it downwards. Mark out the coin-cell battery placement where this arm ends.

Now extend the positive arm of the circuit from at right angles to the negative arm, bring it down at right angles to the edge of the card. Make sure this arm is away from the battery such that it does not touch it. Now place conductive copper tape on the negative arm taking it up to the battery. Attach the negative side of the battery to the copper tape securing it with a tape. Next, past the conductive copper tape along the positive arm.
Insert the colored LED into the flame incision on the candle and separate its positive and negative legs and carefully insert them into the positive and negative tapes respectively.
Now it’s time to complete the circuit so that the LED lights up. Press the outer positive side of the card against the inner negative arm to and see the birthday candle glow on the cake!
These are two of the several modules that are offered as part of the fantastic STEM/STEAM electronic projects for kids learning process offered at https://wizkidsclub.com/courses.
Login and explore more with a FREE 7-DAYs trial period and let your kids love learning different aspects of science and technology as they also give vent to their artistic sides!